
Flattening large wooden slabs can be a challenging and expensive process, especially if you rely on professional equipment or services. However, building a low-cost slab flattening sled with a router can be an effective and budget-friendly solution. In this guide, we’ll walk you through the steps to construct a DIY slab flattening sled using readily available materials. This sled will allow you to achieve a smooth and flat surface on your wooden slabs, making it perfect for creating stunning tables, countertops, and other woodworking projects.
Why Build a Slab Flattening Sled?
A slab flattening sled offers several advantages:
- Cost-Effective: Constructing your own sled is significantly cheaper than purchasing commercial slab flattening systems or hiring professional services.
- Customizable: You can tailor the sled to fit the specific dimensions of your slabs and workspace.
- Versatile: A router sled can be used to flatten a variety of wood types and sizes, making it a valuable tool for any woodworking enthusiast.
Materials and Tools Needed
Before you start building your slab flattening sled, gather the following materials and tools:
Materials
- Plywood or MDF: Two sheets (3/4 inch thick) for the base and the rails.
- 2×4 Lumber: For the support structure.
- Wood Screws: Various lengths (1-1/2 to 2-1/2 inches).
- Wood Glue: For securing joints.
- Sandpaper: For smoothing edges.
- Metal or PVC Pipes: For the sled rails (optional, if you prefer a more rigid structure).
- Router: Preferably a plunge router.
- Router Bit: A large diameter straight bit or flattening bit.
- Measuring Tape: For accurate measurements.
- Clamps: To hold pieces in place during assembly.
Tools
- Circular Saw or Table Saw: For cutting the plywood or MDF.
- Drill and Bits: For making pilot holes and driving screws.
- Router: To flatten the slab.
- Level: To ensure the sled is even and flat.
- Square: For checking right angles.
Step-by-Step Guide to Building a Slab Flattening Sled
Step 1: Cut the Base and Rails
- Measure and Cut the Base:
- Determine the size of the base according to the largest slab you plan to flatten. Cut a piece of plywood or MDF to these dimensions using a circular saw or table saw.
- Cut the Rails:
- Cut two long strips of plywood or MDF to serve as the rails. The length of the rails should match the length of the base, and the height should be around 3-4 inches to accommodate the router.
Step 2: Assemble the Base and Rails
- Attach the Rails to the Base:
- Position the rails along the long edges of the base, ensuring they are perpendicular to the base and parallel to each other. Use wood screws and wood glue to secure the rails to the base. Pre-drill pilot holes to prevent splitting.
- Ensure Stability:
- Check that the rails are firmly attached and level. The sled’s stability is crucial for achieving a flat surface on your slabs.
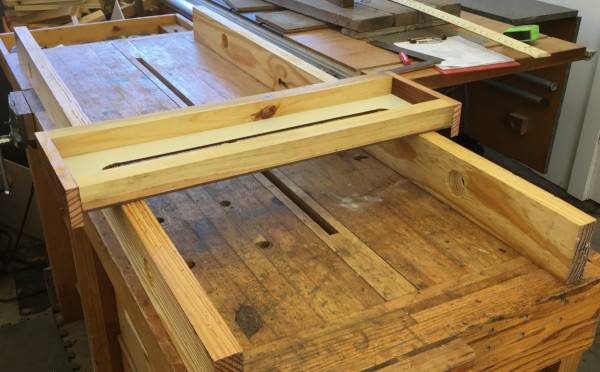
Step 3: Construct the Router Carriage
- Cut the Router Carriage:
- Cut a piece of plywood or MDF to serve as the router carriage. This piece should be slightly wider than the width of the base and long enough to support the router.
- Create a Router Slot:
- Mark and cut a slot in the center of the router carriage to fit the router base. The slot should be wide enough to allow the router bit to pass through but snug enough to keep the router stable.
- Attach Side Rails to the Carriage:
- Attach two strips of plywood or MDF along the edges of the router carriage to prevent the router from slipping off. These side rails will guide the router along the length of the sled.
Step 4: Assemble the Sled and Router Carriage
- Position the Router Carriage:
- Place the router carriage on top of the base, with the router slot aligned with the slab you plan to flatten. The side rails should rest on top of the base rails, allowing the router carriage to move smoothly back and forth.
- Check for Smooth Movement:
- Ensure that the router carriage moves freely and evenly along the base rails. Adjust the fit as needed to achieve smooth motion.
Step 5: Add Optional Enhancements
- Install Metal or PVC Pipes (Optional):
- For added rigidity and smoother motion, you can install metal or PVC pipes along the base rails. Secure the pipes with clamps or brackets, and ensure they are level.
- Sand and Smooth Edges:
- Sand any rough edges on the base, rails, and router carriage to prevent splinters and ensure smooth operation.
Step 6: Flattening Your Slab
- Secure the Slab:
- Place the wooden slab on the base of the sled and secure it with clamps to prevent movement during flattening.
- Set Up the Router:
- Install the router with a flattening bit and adjust the depth of the cut. Start with a shallow depth to remove high spots gradually.
- Begin Flattening:
- Move the router carriage back and forth along the length of the sled, making consistent passes across the entire surface of the slab. Adjust the depth of the cut as needed until the slab is flat.
- Check for Flatness:
- Periodically check the surface with a straight edge or level to ensure even flattening. Make additional passes if necessary.
Conclusion
Building a low-cost slab flattening sled with a router is an excellent DIY project that can save you money and provide you with a versatile tool for your woodworking projects. By following this step-by-step guide, you can construct a sturdy and effective sled that will help you achieve perfectly flat surfaces on your wooden slabs. Enjoy the satisfaction of creating your own tools and the beautiful results they help you achieve in your woodworking endeavors.