
Creating a 3D effect in an epoxy resin table top can transform a simple piece of furniture into a stunning work of art. This technique involves layering different colors and textures of epoxy resin to create depth and visual interest. Whether you’re aiming for the look of flowing water, a geode, or abstract art, layering epoxy resin offers endless creative possibilities. In this guide, we’ll walk you through the process of layering table top epoxy to achieve a captivating 3D effect for the interior of a River Table. If you are wanting to use this technique for just the top of a table like a flood pour we will have a upcoming article in the future going over that process.
Why Create a 3D Effect with Epoxy Resin?
Layering epoxy resin to create a 3D effect has several advantages:
- Visual Depth: The layers of resin create a sense of depth and dimension, making the table top look more intricate and engaging.
- Customization: You can customize the colors, textures, and patterns to match your personal style or decor.
- Durability: Epoxy resin creates a hard, durable surface that is resistant to scratches and stains, ensuring your table top looks great for years.
Materials and Tools Needed
Before you begin, gather the following materials and tools:
Materials
- Epoxy Resin: High-quality table top epoxy resin. We suggest Super Clear Liquid Glass.
- Pigments and Dyes: Resin-specific pigments, dyes, or mica powders. For Pigments we use EyeCandy brand pigments.
- Mixing Cups: Graduated mixing cups for measuring and mixing epoxy.
- Stir Sticks: Wooden or plastic stir sticks for mixing.
- Heat Gun or Torch: For removing bubbles.
- Protective Gear: Gloves, safety glasses, and a respirator.
Tools
- Sandpaper: 120 grit will be needed only if epoxy is left to fully cure before adding another layer
- Level: To ensure your work surface is flat.
- Brushes and Spatulas: For applying and manipulating resin.
- River Table setup in mold
Step-by-Step Guide to Layering Table Top Epoxy for a 3D Effect
Step 1: Prepare Your Work Area
- Set Up a Level Surface:
- Ensure your work surface is completely level to prevent the resin from pooling in one area. Use a level to check and adjust as necessary. Technically since you already have your River Table setup this step should already be completed
- Protect the Area:
- Lay down a plastic drop cloth to protect your work area from resin spills. Use painter’s tape to protect the edges of your table.
- Gather Materials:
- Arrange all your materials and tools within easy reach. This will help streamline the process and prevent mistakes.
Step 2: Mix and Prepare Epoxy resin
- Measure and Mix:
- Measure equal parts of resin and hardener according to the manufacturer’s instructions. Pour the two components into a mixing cup and stir slowly for several minutes, scraping the sides and bottom to ensure thorough mixing.
- Divide and Color:
- Divide the mixed epoxy into separate cups if you plan to use multiple colors. Add pigments, dyes, or mica powders to each cup and mix well.
Step 4: Apply the First Layer
- Pour the Base Layer:
- Pour the first layer of colored epoxy onto the table. Use a brush or spatula to spread it evenly across the surface.
- Remove Bubbles:
- Use a heat gun or torch to gently remove any air bubbles from the epoxy. Hold the heat source a few inches above the surface and move it in a sweeping motion.
- Let It Cure:
- Allow the first layer to cure partially. This usually takes a few hours, but refer to the epoxy manufacturer’s instructions for specific curing times.
Step 5: Add Subsequent Layers
- Repeat the Process:
- Mix additional batches of epoxy resin, adding different colors and textures to each batch.
- Create Depth:
- Pour each new layer of epoxy over the previous one, allowing each layer to cure partially before adding the next. This layering technique creates visual depth and a 3D effect.
- Manipulate the Resin:
- Use brushes, spatulas, or even your fingers (with gloves) to create patterns and textures in the resin. You can swirl colors together, create waves, or form other shapes to enhance the 3D effect.
Step 6: Incorporate Additional Elements (Optional)
- Add Objects:
- To enhance the 3D effect, consider embedding small objects such as stones, shells, or pieces of wood between the layers of resin.
- Use Silicone Molds:
- Create additional 3D elements using silicone molds filled with colored resin. Once cured, these elements can be embedded in the resin layers on the table.
Step 7: Apply the Final Layer
- Final Pour:
- Once you are satisfied with the depth and pattern of your 3D effect, pour a final clear layer of epoxy over the entire surface. This will encapsulate the design and create a smooth, protective finish.
- Remove Final Bubbles:
- Use a heat gun or torch to remove any bubbles from the final layer.
- Allow to Cure:
- Allow the final layer to cure completely. This may take up to 72 hours, depending on the epoxy brand and environmental conditions.
Step 8: Sand and Polish (Optional)
- Sand the Surface:
- If necessary, sand the cured epoxy with fine-grit sandpaper (320-600) to remove any imperfections.
- Polish:
- Use a polishing compound and a soft cloth to buff the surface to a high gloss.
Tips for Best Results
- Work in a Well-Ventilated Area: Epoxy resin can emit fumes, so ensure your workspace is well-ventilated.
- Follow Manufacturer’s Instructions: Always adhere to the specific instructions provided by the epoxy resin manufacturer for mixing ratios, curing times, and safety precautions.
- Experiment with Techniques: Don’t be afraid to experiment with different colors, textures, and tools to create unique effects.
- Patience is Key: Allow each layer to cure properly before adding the next to prevent unwanted blending and ensure a clear, defined 3D effect.
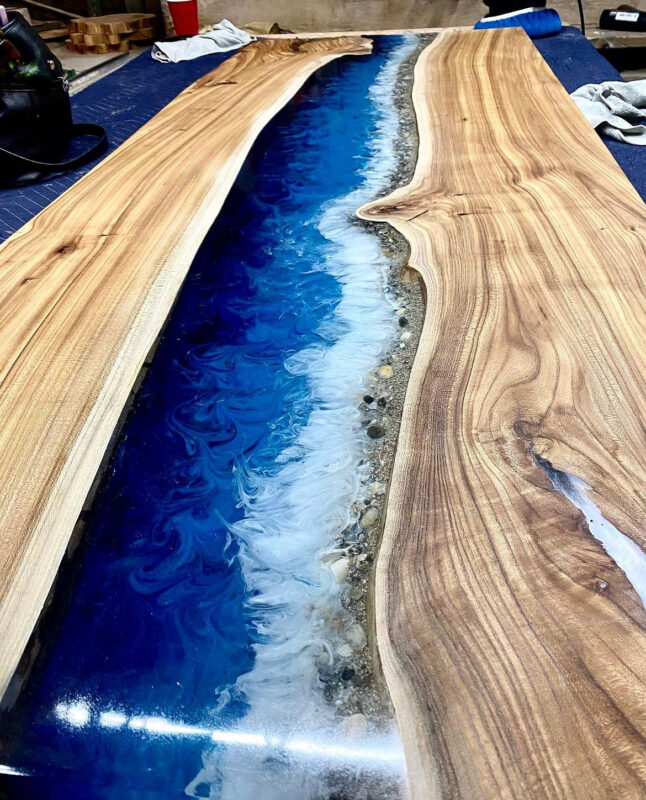
- When I do my colors normally Ill do a layer of two different types of blue, then an additional layer of similar blue, then a layer of clear and I start my waves. I do thin strips of white in the clear to mimic waves and use the heat gun to blow them. Less is more so dont go overboard on the amount of white right away. Add a little and blow it and if you need more add it. You can always add but you can never take away and thats the key to building the layers up to create the effect that you want to.
Conclusion
Layering table top epoxy to create a 3D effect is a fascinating and rewarding process that allows for endless creativity. By following this guide and taking your time with each step, you can transform a simple table into a stunning, three-dimensional masterpiece. Enjoy the journey of exploring different techniques and creating a unique piece that showcases the captivating beauty of epoxy resin art.